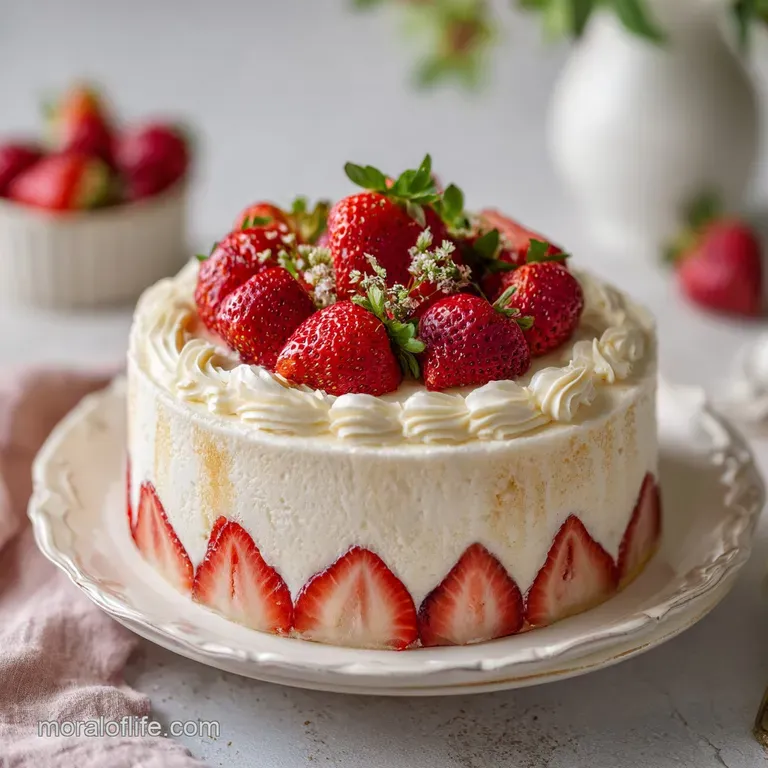
Strawberries Cream Cheesecake Cake: Silky and Layered
- Time: Active 45 minutes, Passive 75 minutes, Total 120 minutes
- Flavor/Texture Hook: Silky cheesecake meeting airy sponge and tart berries
- Perfect for: Birthdays, summer garden parties, or a weekend project
- Creating Your Dream Strawberries Cream Cheesecake Cake
- Reasons This Treat Becomes a Fast Favorite
- Essential Preparation Details and Precise Timing
- Ingredient Deep Dive
- Gathering the Elements for Your Dessert Masterpiece
- Tools for Achieving a Bakery Quality Result
- Step by Step Process for Assembling Layers
- Pro Tips for Preventing Common Baking Mishaps
- Creative Ways to Customize the Flavor Profile
- Storing Your Layers and Minimizing Kitchen Waste
- Presentation Styles for Every Special Occasion
- Recipe FAQs
- 📝 Recipe Card
Creating Your Dream Strawberries Cream Cheesecake Cake
The first time the aroma of simmering strawberries hit my kitchen, I knew I was onto something special. There is a specific, jammy scent that fills the room when you take a whole pound of fresh, hulled berries and cook them down with a splash of lemon juice. It's concentrated, slightly floral, and intensely summery.
That reduction is the literal glue of this strawberries cream cheesecake cake, and honestly, once you smell it bubbling on your stove, you’ll never want to go back to store-bought fillings.
I remember a Saturday afternoon when I tried to rush the cooling process on my first attempt. The kitchen was warm, the sun was streaming through the windows, and I was too impatient to wait the full six hours for the cheesecake to set.
I thought I could assemble it while the core was still slightly "wobbly." It was a disaster, a sliding mess of cream and sponge that looked more like a strawberry landslide than a professional layer cake.
But that mistake taught me the most important lesson about this dish: patience is an ingredient just as vital as the flour or the eggs. When you finally slice into a fully set, chilled version, the way the knife glides through the stabilized whipped cream and hits that firm cheesecake center is incredibly satisfying.
Reasons This Treat Becomes a Fast Favorite
What truly sets this strawberries cream cheesecake cake apart is the architectural contrast. Most cakes are just one texture, but here, we are playing with three distinct sensations.
You have the "shatter" of the cold, stabilized whipped cream frosting, the "velvety" weight of the cheesecake, and the "fluffy" rebound of a reverse creamed vanilla sponge. It’s a sensory experience that feels much more expensive and complicated than it actually is to assemble.
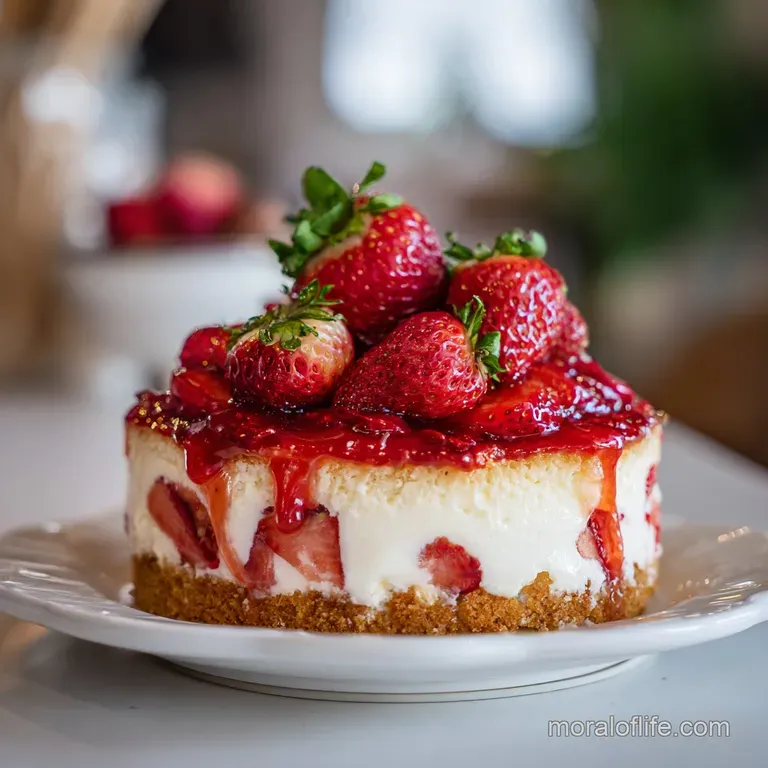
The hero of the show is undoubtedly the fresh strawberry. While some recipes rely on extracts or oils, we use a full pound of real fruit. By reducing the puree by half, we remove the excess water that usually makes cakes soggy.
This leaves behind a potent coulis that cuts through the richness of the 16 oz of full fat cream cheese. It’s a balance of fat, acid, and sugar that keeps you coming back for a second slice even when you think you’re full.
Plus, using vanilla bean paste instead of just extract adds those tiny black flecks that signal to everyone that this is a truly homemade, top tier dessert.
Essential Preparation Details and Precise Timing
- Chilling Strategy: The most critical "passive" time is the 6 hours of chilling. This isn't just a suggestion; it's the time required for the protein structures in the cheesecake to fully bond and the moisture in the sponge to redistribute.
- Temperature Control: Ensure your 16 oz of cream cheese is truly at room temperature. If it's even slightly cold, you'll end up with tiny lumps that no amount of whisking can fully erase.
- The Water Bath: Wrapping the springform pan in heavy duty foil is a non negotiable step. This prevents the "leakage" that ruins the bottom of the cheesecake and ensures the edges stay creamy rather than rubbery.
Low Stress Mixing: Unlike a souffle, the sponge cake uses a reverse creaming method. This means you mix the butter directly into the dry ingredients, coating the flour in fat before any liquid hits it. This limits gluten development, leading to a much more tender, melt in-the mouth crumb.
Temperature Precision: Baking at a steady 325°F (160°C) is the "sweet spot" for this hybrid. It's high enough to give the sponge a gentle rise but low enough that the cheesecake center doesn't puff up and crack like a volcano.
The Reduction Buffer: Simmering the strawberries until they reach a jam like consistency is what prevents the layers from sliding. If the reduction is too thin, it acts like a lubricant; if it’s reduced by exactly half, it acts like a delicious, fruit based cement.
| Method | Time | Texture | Best For |
|---|---|---|---|
| Full Scratch (Oven) | 2 hours | Ultra creamy, complex layers | Special occasions, gifting |
| Shortcut Mix | 1 hour 15 mins | Lighter, sweeter sponge | Weeknight treats, beginners |
| No Bake Hybrid | 4 hours (chill) | Mousse like, softer | Hot summer days, no oven |
When you choose the full scratch method, you are opting for a specific density in the cheesecake that simply can't be replicated with a no bake version. The eggs in the cheesecake core provide a structure that supports the weight of the top sponge layer. If you're looking for another fruit forward project, you might also love my strawberry cheesecake cookies which use a similar flavor profile but in a portable format.
Ingredient Deep Dive
| Ingredient | Science Role | Pro Secret |
|---|---|---|
| Full fat Cream Cheese | Provides structural fat and "tang" | Use the block kind, not the whipped tub version for stability |
| Vanilla Bean Paste | Flavor depth and visual aesthetics | Adds those beautiful black specks that signify high-quality baking |
| Sour Cream | Softens the cheesecake protein | Always use full fat to prevent the cheesecake from becoming grainy |
| Baking Powder | Primary leavening for the sponge | Check the expiry; fresh powder ensures a level, even rise |
The choice of vanilla bean paste over extract might seem like a small detail, but it makes a massive difference in the final aroma. If you find yourself enjoying these berry heavy bakes, you should also check out my strawberry angel food cake for a lighter, airier alternative.
Gathering the Elements for Your Dessert Masterpiece
To make this strawberries cream cheesecake cake, you will need to organize your ingredients by component. Don't let the list intimidate you; many items like sugar and eggs are used across multiple parts of the recipe.
The Cheesecake Core - 16 oz full fat cream cheese, room temperature Why this? Essential for the signature dense, creamy New York style texture. - 0.5 cup granulated sugar - 0.5 cup sour cream Why this? Adds a necessary tang and softens the cheese
protein. - 1 tsp vanilla bean paste - 2 large eggs
The Strawberry Reduction - 1 lb fresh strawberries, hulled and pureed Why this? Fresh berries provide superior acidity compared to frozen. - 2 tbsp lemon juice - 0.25 cup granulated sugar
The Vanilla Sponge - 2.25 cups all purpose flour - 1.5 cups granulated sugar - 1 tbsp baking powder - 0.5 tsp salt - 0.75 cup unsalted butter, softened and cubed Why this? Cubing allows for even distribution during the reverse creaming process. - 0.75 cup whole milk - 3
large eggs
The Stabilized Frosting - 2 cups heavy whipping cream, cold - 0.5 cup powdered sugar - 4 oz cream cheese, softened Why this? Acts as a stabilizer so the cream doesn't deflate or weep.
| Original Ingredient | Substitute | Why It Works |
|---|---|---|
| Sour Cream | Greek Yogurt (Full fat) | Similar acidity and fat content. Note: May result in a slightly firmer texture |
| Vanilla Bean Paste | Vanilla Extract (2 tsp) | Provides the same base flavor without the bean specks |
| Fresh Strawberries | Frozen Strawberries | Can be used for puree. Note: May require 5-10 mins longer reduction time |
Tools for Achieving a Bakery Quality Result
You don't need a professional kitchen, but a few specific tools will make your life significantly easier. An 8 inch springform pan is non negotiable for the cheesecake layer. If you try to use a standard cake pan, you’ll never get the cheesecake out in one piece without a struggle.
A stand mixer, like a KitchenAid, is also a huge help for the frosting, as whipping heavy cream to stiff peaks by hand is a workout most of us don't want on a baking day.
I also highly recommend using heavy duty aluminum foil. The cheap, thin stuff tends to tear when you're wrapping the base of the springform pan, and even a tiny pinhole will let water in. If water gets into your cheesecake, it becomes "soggy" and loses its structural integrity.
Finally, a small offset spatula is your best friend when it comes to frosting the exterior. It allows you to get those smooth, clean lines that make the cake look like it came from a high end patisserie.
step-by-step Process for Assembling Layers
Phase 1: Crafting the Cheesecake Core
- Preheat your oven to 325°F (160°C).
- Wrap the exterior of an 8 inch springform pan in two layers of heavy duty foil. Note: This ensures no water seeps into the crust less base during the water bath.
- Beat 16 oz cream cheese and 0.5 cup sugar until smooth.
- Fold in 0.5 cup sour cream and 1 tsp vanilla paste.
- Add 2 eggs one at a time, mixing just until the yellow streaks disappear. Note: Over mixing here incorporates air, which causes the cheesecake to puff and then crack.
- Pour into the pan and place in a larger roasting tray filled with 1 inch of hot water.
- Bake for 40-45 minutes until the edges are set but the center still has a slight jiggle.
Phase 2: Building the Strawberry Coulis
- In a saucepan, combine 1 lb pureed strawberries, 2 tbsp lemon juice, and 0.25 cup sugar.
- Simmer over medium low heat for 15-20 minutes until the liquid has reduced by half and looks like a thick glaze.
- Remove from heat and let cool completely. It will thicken further as it sits.
Phase 3: The Vanilla Bean Sponge
- Whisk 2.25 cups flour, 1.5 cups sugar, 1 tbsp baking powder, and 0.5 tsp salt in a large bowl.
- Beat in 0.75 cup cubed butter until the mixture looks like coarse, damp sand.
- Whisk in 0.75 cup milk and 3 eggs.
- Divide batter into two greased 8 inch cake pans.
- Bake for 25-30 minutes until a toothpick comes out clean and the tops are golden.
- Allow all layers to cool, then chill the cheesecake for at least 6 hours before assembly.
Phase 4: Final Assembly
- Whip 2 cups heavy cream, 0.5 cup powdered sugar, and 4 oz cream cheese until stiff peaks form and the whisk leaves deep tracks.
- Place one sponge layer down. Spread a thin layer of strawberry reduction on top.
- Carefully unmold the cheesecake and place it on top of the berry layer.
- Spread the remaining reduction over the cheesecake, then top with the second sponge.
- Frost the entire cake with the stabilized whipped cream.
Pro Tips for Preventing Common Baking Mishaps
Why Your Cheesecake Cracked
A crack in the center of your cheesecake usually comes from two things: over mixing or over baking. When you beat the eggs too vigorously, you're essentially making a souffle. The air bubbles expand in the oven and then collapse as the cake cools, leading to a split.
If the edges are brown and the center is firm, you've gone too far.
| Problem | Root Cause | Solution |
|---|---|---|
| Lumpy Batter | Cold cream cheese | Ensure cheese is room temp (approx 2 hrs on counter) |
| Soggy Cake Base | Leaking water bath | Use double layered heavy duty foil or a silicone protector |
| Sliding Layers | Reduction too thin | Simmer berries until they coat the back of a spoon heavily |
Chef's Tip: If your cheesecake does crack, don't panic! This is a layered cake. The strawberry reduction and the top sponge layer will hide any surface imperfections. As long as it's fully cooked, the taste will be exactly the same.
Common Mistakes Checklist
- ✓ Pat the strawberries dry before pureeing to ensure you aren't adding excess water to the pan.
- ✓ Use a warm, damp knife to smooth the cheesecake batter before it goes into the oven for an even surface.
- ✓ Never skip the 6 hour chill; the cheesecake needs that time to become structurally sound enough to hold the top sponge.
- ✓ Scrape the bottom of your mixing bowl frequently to avoid unmixed pockets of flour or butter in the sponge batter.
- ✓ Ensure your heavy cream is ice cold before whipping; warm cream will not hold its volume.
Creative Ways to Customize the Flavor Profile
If you want to take this strawberries cream cheesecake cake in a different direction, the foundations are very flexible. One of my favorite variations is the Roasted Balsamic Twist.
Before pureeing the strawberries, toss them with a tablespoon of balsamic vinegar and roast them at 400°F (200°C) for 15 minutes. This deepens the flavor and adds a sophisticated, savory edge that balances the sweetness of the sponge.
The Shortcut: Strawberry Cream Cheese Cake with Cake Mix
If you're short on time, you can absolutely use a box of high-quality white cake mix for the sponge layers. Just follow the package directions but replace the water with whole milk and add an extra egg for a richer, "bakery style" crumb.
You still get the benefits of the homemade cheesecake core and the fresh berry reduction, but you save about 20 minutes of active prep time.
The Citrus Brightener
Add the zest of two lemons to the sponge batter and a teaspoon of lemon zest to the frosting. This creates a "Strawberry Lemonade" version of the cake that is incredibly refreshing for summer birthdays. The acidity helps cut through the 47g of fat per serving, making the cake feel much lighter on the palate.
Storing Your Layers and Minimizing Kitchen Waste
Because of the fresh fruit and the whipped cream frosting, this cake must be kept in the refrigerator. It will stay fresh and delicious for up to 3 days. I actually find that the flavors meld even better on the second day, as the strawberry reduction slightly permeates the sponge layers, making them even moister.
Freezing Guidelines: You can freeze the individual sponge layers and the cheesecake core separately (wrapped tightly in plastic wrap and foil) for up to 2 months. However, I do not recommend freezing the fully assembled cake.
The whipped cream frosting has a tendency to change texture and "weep" once it thaws, which can ruin the look of your masterpiece.
Zero Waste Tip: Don't throw away the strawberry tops or the hulls! You can toss them into a jar of water to make a subtle strawberry infused spa water, or simmer them with a bit of sugar and water to make a light strawberry syrup for cocktails or morning pancakes.
Presentation Styles for Every Special Occasion
Plating is where you can really show off. Depending on the event, you can scale the look of this cake from a rustic home style treat to a restaurant quality showstopper.
Three Levels of Plating
- Simple: Just a clean coat of the stabilized whipped cream with a few halved strawberries piled in the center. It’s honest, beautiful, and inviting.
- Polished: Use a piping bag with a large star tip to create a border around the top and bottom edges. Slice the strawberries thinly and fan them out in a concentric circle on top.
- Restaurant: Serve individual slices on a plate with a deliberate smear of any leftover strawberry reduction. Garnish with a sprig of fresh mint and a tiny dusting of powdered sugar right before serving.
| Plating Level | Key Feature | Vibe |
|---|---|---|
| Simple | Spatula swirls | Cozy, family dinner |
| Polished | Piped borders | Birthday, celebration |
| Restaurant | Coulis smear & mint | Upscale dinner party |
Decision Shortcut
- If you want a denser, richer cake: Use the full fat ingredients exactly as listed and don't over whip the sponge batter.
- If you want a lighter, fluffier cake: Fold in a cup of whipped topping to the cheesecake batter before baking (note: this will change the bake time).
- If you want a punchier fruit flavor: Double the strawberry reduction and use it as a "soak" for the sponge layers by poking small holes in the cake before spreading the berries.
Debunking Kitchen Myths
One of the biggest myths in baking is that you need a specialized "cake flour" for a tender sponge. While cake flour has less protein, the reverse creaming method we use here allows all purpose flour to perform just as well.
By coating the flour particles in butter first, we prevent the water in the milk and eggs from activating the gluten. Another myth is that the "jiggle" in the center of a cheesecake means it's raw.
In reality, that residual heat continues to cook the center for another 10-15 minutes after it leaves the oven. If it's solid when you pull it out, it will be overcooked and rubbery by the time it cools!
Scaling the Recipe
If you need to feed a larger crowd, you can double this recipe and use two 9 inch pans for the sponge and one 10 inch pan for the cheesecake. Note that for the cheesecake, you should only increase the salt and spices to 1.5x to avoid overwhelming the delicate dairy flavors.
When doubling the sponge, reduce the total liquid by about 10% to ensure the structure remains stable enough to hold the extra weight. If you're scaling down to a 6 inch cake, reduce the baking time by 20% and use half an egg (beat it first, then measure out 1.5 tablespoons).

Recipe FAQs
How to achieve a perfectly smooth cheesecake layer?
Use a warm, damp knife to smooth the surface before baking. Scraping the bottom of your mixing bowl frequently during the beating of your cream cheese and sugar also prevents lumpy pockets in the batter.
Can I freeze the assembled cake for later?
No, avoid freezing the fully assembled cake. The fresh whipped cream and strawberry reduction will lose their texture and structure upon thawing. If you need to prepare ahead, freeze the sponge layers and cheesecake core separately, then assemble after thawing.
How to ensure the whipped cream frosting remains stable?
Start with ice-cold heavy whipping cream and bowl. If you enjoyed mastering this stabilization technique, see how we apply the same no-bake structural principles to create firm dessert bars.
Is it true I can bake the cheesecake and sponge together in the same pan?
No, this is a common misconception. The cheesecake and sponge require different baking environments and cooling times. You must bake them separately as outlined to ensure the correct texture for each layer.
How to prevent the strawberry reduction from becoming too runny?
Simmer the puree, lemon juice, and sugar over medium low heat until reduced by half. Patting the strawberries dry before pureeing is also essential to ensure you do not add excess moisture to the reduction process.
Why is the 6-hour chill time mandatory?
The cheesecake requires this time to become structurally sound. Without sufficient chilling, the cheesecake layer will be too soft to support the weight of the sponge layers, leading to structural failure during assembly.
How to keep the cake fresh after assembly?
Store the cake in the refrigerator at all times due to the fresh fruit and cream. It will stay fresh for up to 3 days, and the flavors often improve on the second day as the strawberry reduction permeates the sponge.
Strawberries Cream Cheesecake Cake

Ingredients:
Instructions:
Nutrition Facts:
| Calories | 633 kcal |
|---|---|
| Protein | 10 g |
| Fat | 47 g |
| Carbs | 68 g |
| Fiber | 1 g |
| Sugar | 58 g |
| Sodium | 352 mg |
