Tri Tip Seasoning
- Time: Active 5 minutes, Passive 30 minutes, Total 35 minutes
- Flavor/Texture Hook: Shatter crisp fat cap with a savory, peppery bite
- Perfect for: Sunday family dinners or easy weeknight meal prepping
- Unlocking Bold Flavor with Tri Tip Seasoning
- The Molecular Magic of Searing Meat
- Seasoning Recipe Specs
- The Best Ingredient Choices
- Essential Kitchen Tools
- Step-by-Step Preparation Guide
- Solving Common Cooking Issues
- Flavor Swaps and Twists
- Leftovers and Storage Tips
- Ideal Side Dish Pairings
- Frequent Seasoning Questions
- Recipe FAQs
- 📝 Recipe Card
You know that specific aroma when meat hits a scorching hot grill and the fat begins to sizzle? It is that primal, smoky scent that brings everyone into the kitchen before the timer even goes off.
For a long time, I struggled with tri tip because I was either over complicating the flavors or not giving the seasoning enough time to actually work its magic. I’ve had my share of bland, grey roasts that looked okay but tasted like nothing on the inside.
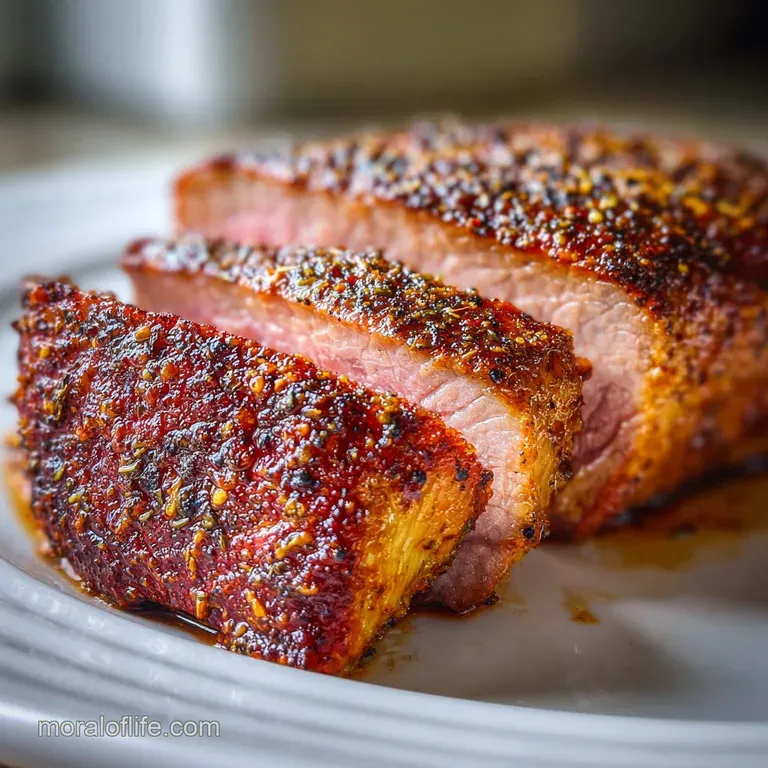
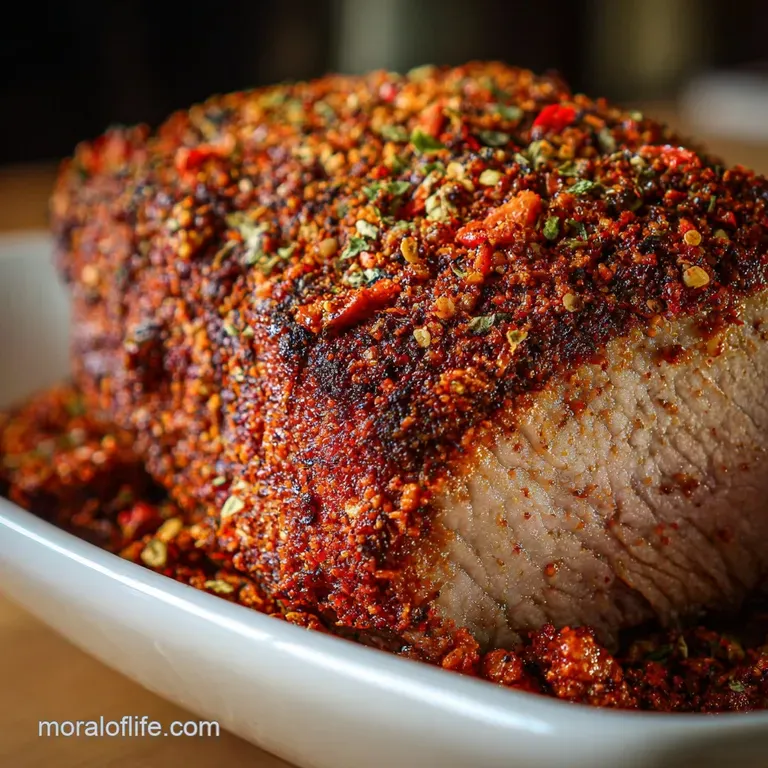
We are going for a dependable, classic profile here. This isn't about fancy, hard to find ingredients that sit in the back of your pantry for three years. It is about using what you have to create a mahogany colored crust that contrasts beautifully with a velvety, pink center.
We’ve all had those busy days where we just need a win, and this rub is exactly how you get there without the stress.
I promise that once you try this specific ratio, you’ll repeat it with confidence every single time you see a nice cut of beef at the store. We'll look at why coarse salt is non negotiable and how to apply it so it doesn't just fall off into the flames.
Trust me on this, the prep flow is so simple you could do it while helping with homework or catching up on your favorite show. Let's crack on.
Unlocking Bold Flavor with Tri Tip Seasoning
The Molecular Magic of Searing Meat
Before we get the grill going, we need to understand what happens when these spices meet heat. It isn't just about making things salty; it is a chemical transformation that changes the texture of the beef.
- Osmosis: Salt draws moisture out of the meat, which then dissolves the spices into a concentrated brine that the fibers eventually reabsorb for deep seasoning.
- Maillard Reaction: The proteins and sugars in the beef react with the heat, creating that complex, savory "browned" flavor and a crust that will shatter under your knife.
- Hygroscopic Properties: Onion and garlic powders are "water loving," meaning they grab onto the surface moisture to form a tacky paste that sticks to the meat during the cook.
Chef's Note: For an unconventional boost, add half a teaspoon of finely ground espresso beans. The acidity doesn't make it taste like coffee, but it reacts with the beef to create an incredibly dark, rich color that looks professional.
| Ingredient | Science Role | Pro Secret |
|---|---|---|
| Kosher Salt | Protein Denaturation | Use Diamond Crystal for its hollow shape; it dissolves 50% faster than table salt. |
| Black Pepper | Surface Texture | Use coarse ground only. Fine powder burns into a bitter ash, while coarse grains provide a "crunch." |
| Smoked Paprika | Color Catalyst | The oil soluble pigments in paprika bloom in the fat cap, creating a vibrant red brown hue. |
When you apply this blend, you are essentially creating a barrier that protects the delicate interior of the meat. If you love a good crust on your proteins, you might also find success with the technique used for this Air Fryer Chicken Thighs recipe which focuses on that same shatter crisp skin.
Seasoning Recipe Specs
For this recipe, we are keeping things focused on a standard 2.5 to 3 pound roast. This blend produces enough for 12 servings, which is perfect if you are feeding a crowd or planning for leftovers throughout the week.
- Prep Time:5 minutes
- Cook Time:30 minutes
- Total Time:35 minutes
- Yield: 12 servings (approx. 1/2 tablespoon of rub per serving)
The Best Ingredient Choices
Choosing the right components is the difference between a "good" dinner and a meal that your family asks for every single week. I always reach for coarse textures because they withstand the high heat of grilling or roasting much better than fine powders.
- 4 tbsp Kosher Salt: Why this? It provides a clean salt flavor without the harsh metallic aftertaste of iodized table salt.
- 3 tbsp Coarse Ground Black Pepper: Why this? The large flakes create a textural bite and a beautiful "dalmatian" look on the crust.
- 2 tbsp Garlic Powder: Why this? It distributes more evenly than fresh garlic, which often burns and turns bitter at high temps.
- 1 tbsp Onion Powder: Why this? Provides a savory, caramelized sweetness that rounds out the sharp pepper notes.
- 1 tbsp Smoked Paprika: Why this? Adds a hint of woodsy depth that mimics hours spent in a professional smoker.
- 1 tsp Dried Parsley or Rosemary: Why this? Adds an earthy top note that cuts through the richness of the beef fat.
- 0.5 tsp Cayenne Pepper: Why this? Just enough to wake up the palate without making the dish actually "spicy."
| Original Ingredient | Substitute | Why It Works |
|---|---|---|
| Kosher Salt | Sea Salt (Flaky) | Similar mineral profile, but use 20% less by volume as sea salt is denser. |
| Smoked Paprika | Chipotle Powder | Adds a similar smokiness but increases the heat level significantly. |
| Dried Rosemary | Dried Thyme | Thyme is more subtle and pairs naturally with the onion and garlic base. |
If you find yourself running low on these staples, don't panic. Many of these aromatics are also used in my go to for Dinner recipe which is another lifesaver on those nights when you just want something dependable on the table fast.
Essential Kitchen Tools
You don't need a high end kitchen to get this right. I usually just use a small glass jar for mixing. It allows me to shake everything together vigorously, which ensures the cayenne doesn't all end up in one spot.
A digital meat thermometer is your best friend here. While we are focusing on the tri tip seasoning, the seasoning only tastes as good as the meat's texture. Pulling the roast at exactly 130°F (54°C) for medium rare is the secret to that velvety finish.
I also recommend a heavy cast iron skillet if you are cooking indoors, as it holds heat better than stainless steel and helps develop that deep sear.
step-by-step Preparation Guide
1. The Blend
In a small bowl or jar, combine the 4 tbsp Kosher Salt, 3 tbsp Coarse Ground Black Pepper, 2 tbsp Garlic Powder, 1 tbsp Onion Powder, 1 tbsp Smoked Paprika, 1 tsp Dried Parsley, and 0.5 tsp Cayenne Pepper. Shake or whisk until the color is a uniform, speckled orange red.
2. Meat Prep
Pat your beef completely dry with paper towels. Note: Any surface moisture will steam the meat rather than sear it, preventing the crust from forming.
3. Application
Sprinkle the rub generously over all sides of the meat. Don't forget the thin edges!
4. The Press and Apply Technique
Use the palms of your hands to firmly press the seasoning into the meat fibers. Note: This ensures the rub sticks during the flip on the grill.
5. The Rest
Let the seasoned meat sit at room temperature for at least 30 minutes. Note: This allows the salt to begin the osmosis process, drawing flavor into the center.
6. High Heat Sear
Place the meat on a hot grill or in a hot pan. Cook for about 5 minutes per side until a dark mahogany crust forms and the fat sizzles.
7. Indirect Finish
Move the meat to a cooler part of the grill or lower your oven temp. Continue cooking for about 20 minutes until the internal temperature reaches 130°F.
8. The Final Rest
Transfer the roast to a cutting board and wait 10 minutes. Note: Slicing too soon lets the velvety juices run out, leaving you with dry meat.
Solving Common Cooking Issues
Why Your Rub Is Falling Off
If you find that your seasoning is staying in the pan instead of on the steak, it’s usually because the meat was too wet or you didn't press it in. I made this mistake once when I was in a rush I just sprinkled it on like glitter. The result was a patchy, sad looking roast. Always pat that meat dry first!
Why the Seasoning Tastes Bitter
This usually happens if the heat is too high for too long, causing the garlic and onion powders to scorch. They turn into little carbon bits that taste like burnt toast. The "sear then move" method is the fix for this. Get your color early, then let the ambient heat finish the job.
| Problem | Root Cause | Solution |
|---|---|---|
| Crust is soggy | Surface moisture | Pat meat bone dry; avoid oiling the meat before the rub. |
| Too salty | Fine salt used | Always use Kosher salt; if using table salt, cut the amount in half. |
| Flavor is flat | Old spices | Use spices bought within the last 6-12 months for maximum potency. |
If you ever find the seasoning is a bit too intense, you can balance the plate with a bright, acidic side dish. Something like a crisp salad or even a bowl of fire roasted vegetables works wonders.
Flavor Swaps and Twists
If you are a fan of regional styles, you can easily tweak this base. For a traditional Santa Maria style, keep it strictly to the salt, pepper, and garlic powder, omitting the paprika and herbs. It is a simpler, more beef forward profile that locals swear by.
- For a Coffee Rubbed Variation
- Add 1 tbsp of finely ground dark roast coffee to the mix.
- For a Low Sodium Diet
- Reduce the salt to 1 tbsp and add 1 tbsp of nutritional yeast for a savory "umami" punch without the sodium.
- For a Sweet Heat
- Add 1 tbsp of brown sugar. This is great for smoking, as the sugar carmelizes into a sticky glaze.
| Method | Heat Level | Crust Style |
|---|---|---|
| Stovetop (Cast Iron) | High | Uniform, dark sear across the entire surface. |
| Outdoor Grill | Medium High | Charred, "striped" sear with added smoky notes. |
| Oven Roasting | Medium | Softer crust but very consistent edge to edge pinkness. |
Regardless of the method, the goal is always the same: a dependable, flavorful result that makes you feel like a pro.
Leftovers and Storage Tips
I always make a double batch of this rub because it stays fresh in the pantry for months. Just keep it in an airtight jar away from the steam of the stove. As for the cooked meat, it stays good in the fridge for about 4 days.
I love thinly slicing cold leftovers for sandwiches the next day it is honestly better than any deli meat you can buy.
- Fridge: Store in an airtight container for up to 4 days.
- Freezer: You can actually freeze the meat after you’ve applied the rub. The salt acts as a dry brine while it thaws!
- Zero Waste: Don't throw away the bits of seasoning left on the cutting board. Toss some roasted potatoes in those juices and spices for a quick side.
Ideal Side Dish Pairings
Because this beef is so savory and rich, it pairs beautifully with starches that can soak up the juices. A pile of garlic mashed potatoes or some crusty sourdough bread is a must. If you want something lighter, a vinegar based slaw provides a sharp contrast to the smoked paprika in the rub.
Honestly, don't even bother with complicated sauces. The beauty of this seasoning is that it creates its own "sauce" as the meat rests and the juices mingle with the spices. If you must, a simple chimichurri or a dollop of horseradish cream is all you need to round out the meal.
Frequent Seasoning Questions
Coarse Salt vs. Table Salt: Which is better?
Coarse salt is significantly better for this application. Because the crystals are larger, they don't dissolve instantly. This allows them to create a localized "crust" on the meat's surface. Table salt is too dense; if you use 4 tablespoons of table salt, your meat will be completely inedible.
Fresh vs. Dried Herbs: Which works best in a rub?
For a dry rub that will face high heat, dried herbs are actually superior. Fresh herbs like rosemary or parsley have a high water content and tend to turn black and bitter when they hit a hot grill. Dried herbs are more stable and provide a consistent, earthy flavor throughout the 30 minute cook time.
Homemade vs. store-bought: Is it worth the effort?
Making it yourself is always the way to go. Most store-bought "steak rubs" are filled with anti caking agents and way too much sugar. By mixing your own, you control the salt levels and the quality of the pepper.
Plus, it only takes 5 minutes, which is less time than it takes to find a pre made bottle in the spice aisle!
Oven vs. Grill: Does the seasoning change?
The seasoning stays exactly the same! The only difference is that on a grill, the smoked paprika will lean into the natural charcoal flavors, while in the oven, it provides the "smoke" that the appliance lacks. Both methods result in a dependable, savory roast that your family will love.

Recipe FAQs
What seasoning is best for tri-tip?
A classic blend of Kosher salt, coarse black pepper, garlic powder, onion powder, and smoked paprika is best. This combination creates a deep crust and savory flavor that complements the beef without overpowering it. For a touch of heat, a little cayenne is a great addition, just like the flavor base for this Air Fryer Chicken Wings: The Crispiest Dry Rub.
Should you marinate or dry rub a tri-tip?
A dry rub is generally preferred for tri-tip. It allows for better crust development through the Maillard reaction and osmosis from the salt. Marinades can add flavor but may hinder the formation of that desirable, savory bark. For a different technique that focuses on intense flavor infusion, explore our Taco Meat Recipe: Mahogany Finish.
How long should you season a tri-tip?
Season at least 30 minutes before cooking, and up to several hours for deeper flavor. This allows the salt in the rub to begin its work, drawing out moisture and creating a flavorful brine that reabsorbs into the meat. If you enjoyed mastering the timing here, see how the same principle of resting meat applies in our How to Cook a Boston Butt: Tender & Flavorful recipe.
What is the secret to a juicy tri-tip?
The secret to a juicy tri-tip lies in accurate temperature control and proper resting. Pull the roast off the heat when it reaches an internal temperature of 130-135°F (54-57°C) for medium rare, and let it rest for at least 10 minutes before slicing.
This allows the juices to redistribute throughout the meat, ensuring a tender, moist result.
Can I use table salt instead of Kosher salt for tri-tip seasoning?
No, it's strongly recommended to use Kosher salt. Table salt is much denser and finer, meaning you'll use significantly more volume to achieve the same salinity, leading to an overly salty and potentially unpleasant taste.
Kosher salt's larger, irregular crystals dissolve more evenly and provide better texture on the crust.
What is the role of smoked paprika in tri-tip seasoning?
Smoked paprika acts as a color catalyst and adds a subtle smoky depth. Its oil-soluble pigments bloom in the fat cap during cooking, contributing to a beautiful mahogany crust that mimics the flavor of slow smoked meats. This visual appeal is similar to how vibrant colors are achieved in dishes like Daniel Fast Snack with Roasted Chickpeas: Crispy.
How do I get my tri-tip rub to stick?
Always pat your tri-tip completely dry with paper towels before applying the rub. Surface moisture will prevent the seasoning from adhering properly and can lead to steaming instead of searing. After applying the rub, firmly press it into the meat with your palms to ensure it stays put during cooking.
Tri Tip Seasoning

Ingredients:
Instructions:
Nutrition Facts:
| Calories | 14 kcal |
|---|---|
| Protein | 0.6 g |
| Fat | 0.2 g |
| Carbs | 3.2 g |
| Fiber | 0.8 g |
| Sugar | 0.1 g |
| Sodium | 1775 mg |
