Best 7 Layer Dip Recipe for Game Day with Refried Beans
- Time: Active 15 minutes, Passive 30 minutes, Total 45 minutes
- Flavor/Texture Hook: A velvety, zesty blend with a refreshing crunch
- Perfect for: Stress free game day hosting or a dependable potluck contribution
- The Best 7 Layer Dip Recipe for Game Day
- Why This Layered Dip Works
- Timing and Nutrition Specifications
- Analysis of Our Essential Ingredients
- Minimal Tools for Fast Preparation
- Precise Steps for Perfect Layers
- Avoiding Common Dipping Mistakes
- Adjusting for Large or Small Crowds
- Debunking Popular Dipping Myths
- Storage and Leftover Safety Tips
- Presentation Ideas for Your Party
- Recipe FAQs
- 📝 Recipe Card
The Best 7 Layer Dip Recipe for Game Day
There is a specific sound that happens when you peel back the plastic wrap on a perfectly chilled dip, a soft "tshhh" as the seal breaks, followed by that immediate hit of cumin and fresh lime.
I remember one specific Tuesday night not even a big game night, just a casual gathering where I rushed the process and didn't drain my salsa. By the time the third person went in for a scoop, the beautiful layers had turned into a muddy, pink soup.
It was a disaster, but it taught me everything I know now about the physics of a great dip.
This article shares the very best 7 layer dip recipe for game day, featuring creamy refried beans. We’ve all seen those versions that look great for five minutes then start weeping liquid at the bottom of the dish.
I’ve spent years tweaking the "architecture" of this dish to make sure the bottom layer stays firm and the top stays vibrant. You’re going to get a dip that actually stands up to a heavy corn chip without snapping it in half.
We are talking about a structure that is dependable and repeatable. You don't need fancy equipment, just a bowl, a spoon, and about 15 minutes of your time. This recipe is the one I go back to every single season because it just works.
It’s the kind of dish where people ask for the recipe before they’ve even finished their first plate. Let’s get into how we make this happen without the common soggy pitfalls.
Why This Layered Dip Works
The Architecture of Moisture Control: Fat rich layers like cream cheese act as a hydrophobic barrier, preventing the liquid from the salsa from soaking into the bean base. This structural separation keeps the textures distinct and the bottom layer from becoming mushy.
- Starch Gelatinization: The refried beans contain pre gelatinized starches that, when combined with a little moisture and spices, create a thick, spreadable paste that sets firmly when chilled.
- Emulsified Stability: Whipping the sour cream with softened cream cheese creates a stable emulsion that resists "weeping" or separating even at room temperature.
- Capillary Action Prevention: Deseeding the tomatoes and straining the salsa removes the free flowing water that typically migrates through the layers via gravity.
| Servings | Ingredient Adjustments | Dish Size | Total Prep |
|---|---|---|---|
| 6 People | Use 1/2 quantities listed | 20cm Square | 15 minutes |
| 12 People | Use full quantities listed | 23x33cm Rectangular | 15 minutes |
| 24 People | Double all quantities | Two 23x33cm Dishes | 25 minutes |
Choosing the right vessel is honestly half the battle when you're feeding a crowd. For a normal Tuesday or a casual hang, a standard 23x33cm glass dish is my go to because it shows off those beautiful stripes of green, red, and white. If you're heading to a Mexican Food Potluck recipe, you might even want to double up and use two separate dishes to keep the dip fresh in shifts.
Timing and Nutrition Specifications
When we talk about a recipe being "quick," we usually mean the hands on part. This dip is incredibly fast to assemble, but the real secret is the rest time. Giving it 30 minutes in the fridge allows the flavors to meld and the bean layer to firm up.
It’s the difference between a dip that tastes like individual ingredients and one that tastes like a unified masterpiece.
| Ingredient | Science Role | Pro Secret |
|---|---|---|
| Refried Beans (450g) | Structural Foundation | Season with cumin while room temp for better oil absorption. |
| Cream Cheese (115g) | Moisture Barrier | Whip until aerated to make scooping easier for chips. |
| Chunky Salsa (240ml) | Acidic Brightness | Always strain through a sieve to prevent "dip lake" syndrome. |
The cream cheese is the unsung hero here. Most people just use sour cream, but that’s a rookie mistake. Sour cream on its own is too thin and will eventually run. By folding in that softened cream cheese, you're creating a "glue" that holds the salsa in place above it and the guacamole below it.
Analysis of Our Essential Ingredients
- 1 can (450 g) refried beans: These provide the hearty, savory base. Why this? Essential for structural integrity and that classic Tex Mex earthy flavor profile.
- 1 tbsp mild chili powder & 1 tsp ground cumin: These wake up the canned beans. Why this? Canned beans are often under seasoned; these spices provide a custom made taste.
- 240 ml full fat sour cream: Adds the necessary tang. Why this? Full fat has less water content, ensuring the dip stays thick and creamy.
- 115 g softened cream cheese: The secret to a scoopable texture. Why this? Provides body and prevents the sour cream from sliding off the beans.
- 2 tbsp taco seasoning: A quick way to punch up the middle layer. Why this? Contains cornstarch which further helps stabilize the cream layer.
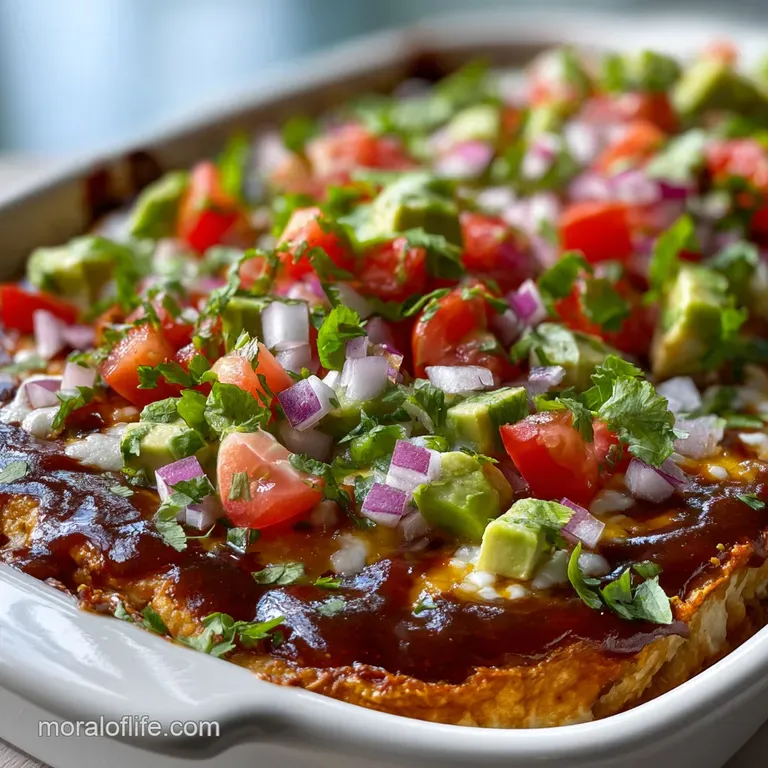
- 475 ml chunky guacamole: The vibrant, buttery middle. Why this? Adds a rich mouthfeel and a beautiful pop of green contrast.
- 240 ml thick salsa: Must be strained of excess liquid. Why this? Provides the necessary acid to cut through the heavy bean and cheese layers.
- 225 g shredded sharp cheddar: A sharp bite to finish. Why this? Sharp cheddar stands up better against the spices than mild varieties.
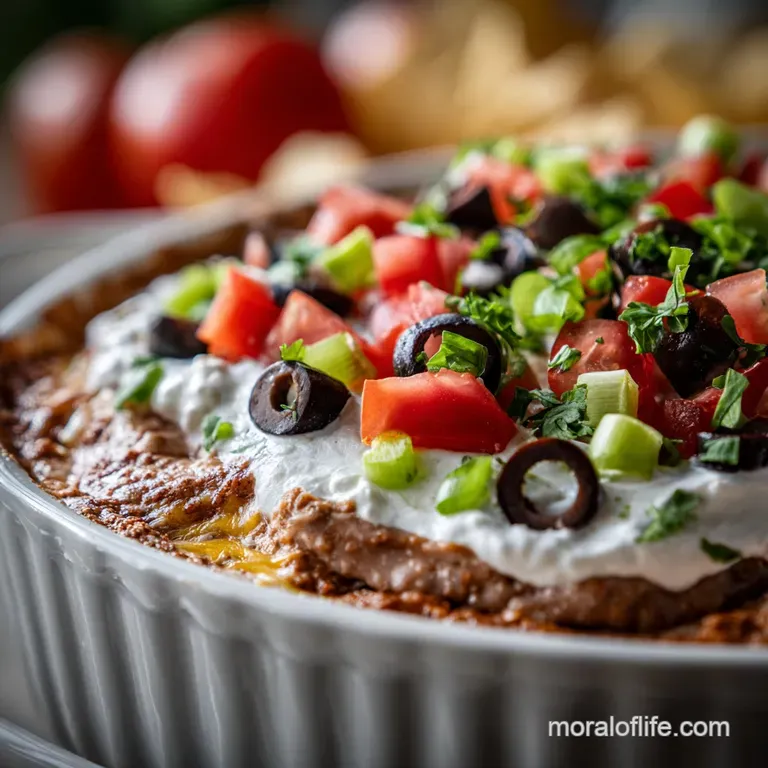
- 75 g sliced black olives & 75 g diced Roma tomatoes: For texture and freshness. Why this? Adds "shatter" and juicy pops that balance the creamy components.
- 15 g fresh cilantro: A final aromatic touch. Why this? Brightens the entire dish and adds a "just made" herb smell.
Chef's Tip: If you want to take this to another level, whisk a teaspoon of the juice from a jar of pickled jalapeños into your sour cream mixture. It adds a subtle back heat and acidity that cuts through the fat perfectly.
For another crowd pleaser that uses similar creamy textures, you should definitely try my Fried Pickle Dipping Sauce recipe for your next gathering. It uses that same principle of balancing fat with high acid ingredients like pickles.
Minimal Tools for Fast Preparation
You don't need a kitchen full of gadgets for this. A simple medium sized mixing bowl is plenty for whisking the cream layer. I highly recommend using a silicone spatula for spreading; its flexibility allows you to push the ingredients right to the edges of your glass dish without disturbing the layer underneath.
A fine mesh sieve is your most important "secret weapon" here. You’ll use it to drain the salsa. If you don't have one, you can line a colander with a paper towel. Just let that salsa sit for at least 10 minutes.
You'll be shocked at how much water comes out water that would have otherwise ruined your dip.
Precise Steps for Perfect Layers
Seasoning the Base Layer
Empty the 450 g of refried beans into a small bowl and stir in the chili powder and cumin. Mix until the spices are invisible and the beans look glossy. Note: Stirring them at room temperature makes them easier to spread evenly without tearing the layer below.
Whipping the Zesty Cream
In a separate bowl, combine the 240 ml sour cream, 115 g softened cream cheese, and taco seasoning. Whisk vigorously for 2 minutes until the mixture is light and fluffy. Note: This aeration makes the layer feel less heavy and more like a mousse.
Engineering Stable Layers
Spread the seasoned beans into the bottom of your dish in an even layer. Use the back of a large spoon to press them firmly into the corners. Follow this with the cream cheese mixture, smoothing it right to the glass edges to "seal" the beans.
Building the Vegetable Core
Carefully dollop the 475 ml of guacamole over the cream layer and spread gently. Work from the center outwards to avoid mixing the colors. Top this with your strained salsa, spreading it thinly but completely across the surface.
Finishing With Fresh Texture
Sprinkle the 225 g of shredded cheddar over the salsa. Add the olives, diced tomatoes, and cilantro in a decorative pattern. Note: Press the toppings lightly into the cheese so they don't fall off when the dish is tilted or moved.
| Feature | Fresh Prep | Shortcut Version |
|---|---|---|
| Beans | Cooked from dried; extra creamy | Canned; faster and more consistent |
| Salsa | Hand chopped pico de gallo | Jarred and strained; better moisture control |
| Guacamole | Mashed fresh avocados | store-bought; stays green longer |
Avoiding Common Dipping Mistakes
Preventing Soggy Bottoms
The most common issue is a pool of liquid forming at the base of the dish. This almost always comes from the salsa or the tomatoes. If you don't deseed your Roma tomatoes, their watery interiors will leak as they sit. Always scoop out the "guts" of the tomato before dicing.
Mastering the Even Spread
If your layers are mixing together, your ingredients are likely too cold or too stiff. Let the refried beans and the cream cheese come to room temperature before you start. Cold beans act like a solid block, making it impossible to spread the next layer without dragging the beans along with your spatula.
Troubleshooting Table
| Problem | Root Cause | Solution |
|---|---|---|
| Watery layers | Salsa or tomatoes not drained | Strain salsa for 10 mins; deseed tomatoes. |
| Broken chips | Bean layer is too hard | Add 1 tbsp of water to beans before spreading. |
| Brown guacamole | Air exposure | Spread salsa immediately over the guacamole to seal it. |
Common Mistakes Checklist:
- ✓ Always use full fat dairy to ensure the layers set firmly in the fridge.
- ✓ Strain the salsa until it looks like "chunky jam" rather than a liquid sauce.
- ✓ Wipe the inside edges of your glass dish with a paper towel between layers for clean lines.
- ✓ Don't skip the cream cheese; sour cream alone is too unstable for long parties.
- ✓ Let the dip chill for at least 30 minutes to allow the flavors to marry and the structure to set.
Adjusting for Large or Small Crowds
If you need to scale this recipe down for a quiet night in, just use half of everything and a smaller 20cm square dish. The assembly steps remain exactly the same. For a tiny batch, you can even layer these into individual clear plastic cups for a "personal dip" experience that prevents double dipping.
When doubling the recipe for a massive party, don't just make one giant, deep dish. A dip that is too deep is hard to scoop. Instead, make two standard sized dishes. This allows you to keep one in the fridge while the first one is being devoured, ensuring the second half of the party gets a fresh, cold dip rather than one that’s been sitting out for three hours.
Debunking Popular Dipping Myths
One major myth is that you should use "low-fat" sour cream to make the dish lighter. In reality, low-fat dairy often contains more thickeners and water, which leads to a grainy texture and a runny mess after an hour. Stick to the full fat versions for the structural integrity required for a layered dish.
Another misconception is that the beans need to be heated first. While warm beans are easier to spread, they will wilt the guacamole and cause the sour cream to melt. Always use room temperature beans and then chill the entire dish. This preserves the distinct temperatures and textures that make the dip so refreshing.
Storage and Leftover Safety Tips
This dip is best served the day it's made, but it will keep in the fridge for up to 3 days if covered tightly with plastic wrap. Just be aware that the salsa may eventually release some liquid, so you might need to tip the dish slightly to drain any "weeping" before serving again.
Do not freeze this recipe the dairy will separate and the vegetables will turn to mush.
To reduce waste, any leftover dip can be stirred into a pot of chili or used as a filling for breakfast burritos. The combination of beans, cheese, and salsa is a perfect head start for a morning wrap.
If you have leftover cilantro or tomatoes that didn't make it onto the dip, toss them into a container for a quick salad topper the next day.
Presentation Ideas for Your Party
If you want your dip to look like it came from a professional kitchen, focus on the edges. When you spread each layer, make sure it touches the glass all the way around. This creates those iconic "stripes" that make people gravitate toward the table.
I like to finish with a heavy border of shredded cheese and put the colorful toppings (tomatoes and olives) right in the center for a target like effect.
Serving this with a variety of chips also makes a difference. Thick cut "scoop" style corn chips are the gold standard because they can handle the weight of all seven layers. If you're looking for a dessert to follow up this savory feast, my Mountain Dew Apple Dumplings recipe provides a great crispy sweet contrast that guests always love.
Finally, remember that height is your friend. If you’re serving this on a buffet, place the dip on a small pedestal or an inverted bowl under a tablecloth. Giving it a bit of elevation makes it the centerpiece it deserves to be.
Trust me, once the game starts and the first chip hits the bowl, this dip won't last long enough for you to worry about how it looks for very long!

Recipe FAQs
What is the key to preventing the 7 layer dip from becoming watery?
Strain the salsa rigorously. Excess liquid from the salsa and diced tomatoes is the primary culprit for a soggy base layer.
How long does this 7 layer dip need to chill before serving for best results?
At least 30 minutes is essential. This chilling time allows the flavors to meld and the crucial refried bean layer to firm up structurally.
Should I use low-fat sour cream to keep the dip lighter?
No, use full fat dairy products. low-fat dairy often contains more water and stabilizers, leading to weeping and a less stable layer structure after sitting out.
How do I create a sharp, distinct layer separation between ingredients?
Ensure your cream cheese is room temperature and whip it well. Whipping the cream cheese with the sour cream creates a stable emulsion that acts as a strong barrier against the watery salsa layer above it.
What can I substitute for refried beans if I want a vegetarian alternative?
Use mashed black beans seasoned identically. If you enjoyed mastering the fat-to-acid balance in this dip, see how the same principle of stabilizing textures applies when you look at our Chili Sauce and recipe recipe.
Is it true that I must layer the ingredients while they are all cold?
False. The beans and cream cheese base must be slightly warm or room temperature so they spread without tearing the layer beneath them.
How do I ensure the guacamole layer stays green until serving time?
Seal the guacamole layer immediately with the strained salsa. The acid in the salsa acts as a mild preservative, preventing surface oxidation on the avocado.
Game Day Refried Bean Dip
Ingredients:
Instructions:
Nutrition Facts:
| Calories | 258 kcal |
|---|---|
| Protein | 9 g |
| Fat | 20 g |
| Carbs | 12 g |
| Fiber | 4 g |
| Sugar | 3 g |
| Sodium | 625 mg |
