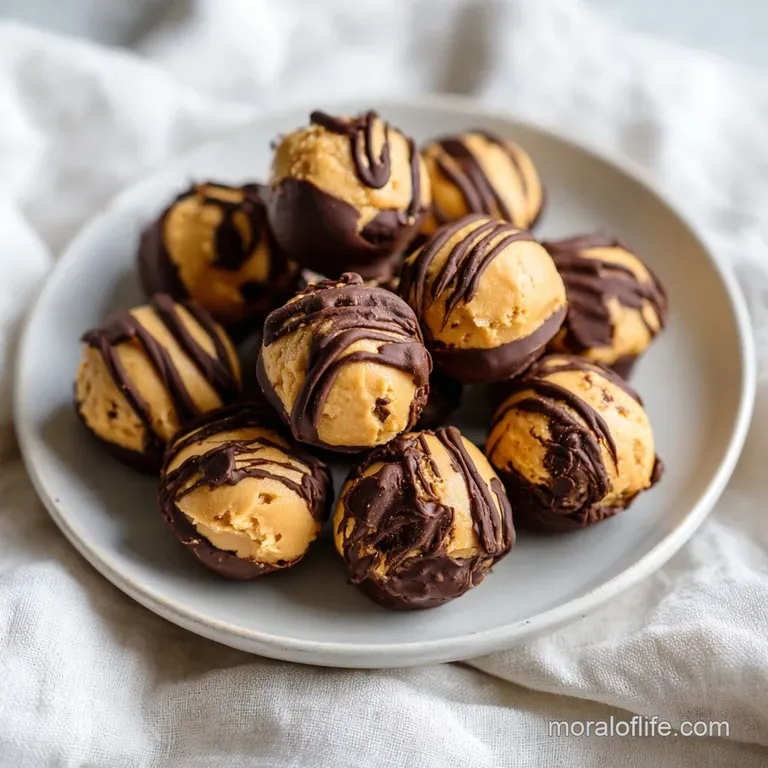
Homemade Peanut Butter Buckeyes: Silky and Rich
- Time: Active 105 minutes, Passive 30 minutes, Total 110 minutes
- Flavor/Texture Hook: Silky peanut butter fudge with a thin, crackling chocolate snap
- Perfect for: Holiday gift tins, game day snacks, or a crowd-pleasing party treat
- Discover the Ultimate Homemade Peanut Butter Buckeye Ball Recipe with Chocolate
- Why the Cool Room Temperature Butter Creates Structural Magic
- Essential Ingredient Role Deep Dive
- Sourcing the Creamiest Peanut Butter and Best Chocolate
- The Only Kitchen Tools You Need for Mess Free Dipping
- Step by Step Instructions for a Velvety Smooth Finish
- Fixing Common Problems and Avoiding Sticky Situations
- Adjusting the Batch Size for Any Crowd
- Debunking Traditional Buckeye Myths
- Keeping Your Peanut Butter Treats Fresh and Snappy
- Three Ways to Plate Your Buckeyes from Simple to Gourmet
- Recipe FAQs
- 📝 Recipe Card
Discover the Ultimate Homemade Peanut Butter Buckeye Ball Recipe with Chocolate
Forget everything you have been told about needing fancy candy thermometers or paraffin wax to get that iconic Buckeye look. I used to think the only way to get that professional, glossy finish was to buy them from a specialty shop, but that is a total myth.
You don't need a professional kitchen or weird additives to achieve a treat that actually stays firm at room temperature and doesn't turn into a greasy mess the second you touch it. Discover the ultimate Homemade Peanut Butter Buckeye Ball Recipe with Chocolate for a truly decadent treat.
There is something so specifically nostalgic about the aroma of peanut butter and vanilla hitting a cloud of powdered sugar. It takes me back to my aunt’s kitchen, where the counters were dusted white and the fridge was packed with trays of these little "buckeyes." When you bite into one of these, you first get that thin, dark snap of the chocolate, followed immediately by the velvety, salty sweet interior that just dissolves on your tongue.
It’s not just a candy; it’s a texture experience that hits every single craving at once.
We are going for a very specific result here: a center that is smooth, not gritty, and a coating that stays put. If you’ve ever had a buckeye where the chocolate slid right off or the inside felt like eating wet sand, you know the struggle. I’ve made those mistakes so you don’t have to.
We are going to focus on the temperature of your fats and the aeration of your sugar to make sure these come out looking like they belong in a high end candy box every single time.
Why the Cool Room Temperature Butter Creates Structural Magic
Most people think "softened butter" means it should be almost oily or squishy enough to put a finger straight through with zero resistance. That is the quickest way to a flat, greasy Buckeye. We want the butter to be cool to the touch pliable, but still holding its shape.
This allows it to whip with the peanut butter, creating tiny air pockets that give us that velvety feel rather than a dense, heavy brick.
- Fat Emulsification: Mixing the peanut butter and butter for 2–3 minutes binds the fats together, preventing the oil from separating later.
- Starch Suspension: Sifting the sugar ensures every tiny grain is coated in fat, which stops the final candy from feeling grainy or sandy.
- Thermal Stability: Refined coconut oil in the chocolate lowers the melting point just enough for a clean snap that doesn't shatter into a million pieces.
- Moisture Control: The sea salt doesn't just add flavor; it balances the hygroscopic nature of the sugar so the balls don't get "sweaty" in the fridge.
| Texture Target | Chilling Time | Visual Cue | Result |
|---|---|---|---|
| Soft/Fudgy | 30 minutes | Matte surface | Hard to dip, very rich |
| Standard Snap | 60 minutes | Firm to touch | Perfect "buckeye" eye look |
| Extra Firm | 120 minutes | Cold, solid core | Best for shipping/gifting |
Chilling is the most underrated step in this entire process. If you skip the 60 minutes in the fridge, the warmth of the melted chocolate will actually melt the outer layer of your peanut butter ball.
This creates a muddy, swirling mess instead of a clean, distinct line between the tan center and the dark coating. Trust me, patience here pays off in the final look.
Essential Ingredient Role Deep Dive
When we look at the components of this recipe, it is tempting to think they are all just for flavor, but they are actually doing heavy lifting for the structure. The choice of creamy versus chunky peanut butter, for instance, isn't just about preference it's about the surface area and how well the powdered sugar can cling to the fats.
| Ingredient | Science Role | Pro Secret |
|---|---|---|
| Creamy Peanut Butter | Primary structural fat | Use a "no stir" brand to ensure the dough doesn't weep oil |
| Powdered Sugar | Texture and structure | Sift twice if your kitchen is humid to prevent stubborn lumps |
| Refined Coconut Oil | Gloss and snap agent | Ensures the chocolate sets with a professional, matte gloss finish |
Using a high-quality vanilla extract is also a non negotiable for me. Since we aren't cooking the filling, the flavor of the vanilla is front and center. It rounds out the sharp sweetness of the sugar and makes the peanut butter taste "deeper" and more complex. If you want to see how these flavors work in a different format, you might love the way the salty sweet balance plays out in a Reeses Peanut Butter Pie.
Sourcing the Creamiest Peanut Butter and Best Chocolate
For this Homemade Peanut Butter Buckeye Ball Recipe with Chocolate, you want to stick to standard creamy peanut butter. While I love the natural stuff you have to stir for my morning toast, it is too unpredictable for candy making. The oil separation can cause your Buckeyes to "leak" through the chocolate.
- 1.5 cups (380g) creamy peanut butter: Stick to brands like Jif or Peter Pan for the best structural results.
- 0.5 cup (115g) unsalted butter: Make sure it is softened to cool room temperature (about 65°F). Why this? It provides the creamy base that makes the centers melt in-your mouth.
- 4 cups (480g) powdered sugar: Sifted to ensure a velvety mouthfeel.
- 1 tsp (5ml) pure vanilla extract: Adds depth to the sweetness.
- 0.25 tsp (1.5g) fine sea salt: To cut through the sugar. Why this? It amplifies the peanut flavor and prevents the candy from being cloying.
- 2 cups (340g) semi sweet chocolate chips: Use a brand with at least 50% cocoa for a good snap.
- 1 tbsp (15g) refined coconut oil: Helps the chocolate flow and set smoothly.
If you find yourself short on semi sweet chips, you can use milk chocolate, but be aware it will be significantly sweeter and softer. Dark chocolate (60% or higher) is a fantastic substitute if you prefer a more sophisticated, bitter contrast to the sugary filling.
The Only Kitchen Tools You Need for Mess Free Dipping
You don't need a lot of gear, but a few specific items make this 105 minutes of prep feel like a breeze instead of a chore. I highly recommend a stand mixer if you have one; the dough gets quite stiff, and a hand mixer might struggle once you hit the third cup of sugar.
- Stand Mixer: Such as a KitchenAid, with the paddle attachment.
- Fine mesh Sieve: Absolutely essential for sifting that sugar.
- Baking Sheets: You'll need two to fit all 36 servings.
- Parchment Paper: Don't use foil; the chocolate will stick to it.
- Toothpicks: These are your "dipping handles."
- Microwave safe bowl: Or a double boiler for the chocolate.
Using parchment paper is a "must" here. Once the chocolate sets, the Buckeyes will slide right off. If you use wax paper, it can sometimes curl up at the edges and smudge your beautiful chocolate shells. For another velvety treat that uses similar mixing techniques, check out this Milk Chocolate Buttercream which is equally obsessed with the right butter temperature.
step-by-step Instructions for a Velvety Smooth Finish
- Sift the 4 cups of powdered sugar through a fine mesh sieve into a large bowl. Note: This aerates the sugar and prevents "sugar lumps" in your finished candy.
- In your stand mixer, beat the 0.5 cup cool room temperature butter and 1.5 cups creamy peanut butter for 2–3 minutes until the mixture is pale and fluffy.
- Add the 1 tsp vanilla extract and 0.25 tsp sea salt to the creamed mixture and mix for another 30 seconds.
- Turn the mixer to the lowest speed and gradually add the sifted powdered sugar. Mix until a smooth, moldable dough forms that doesn't stick to your fingers.
- Scoop the dough and roll into 1 inch spheres (about the size of a bouncy ball).
- Place the spheres on a parchment lined baking sheet and insert a toothpick into the center of each.
- Chill the tray in the refrigerator for at least 60 minutes until the balls are firm and cold to the touch.
- Melt the 2 cups chocolate chips and 1 tbsp coconut oil in 30 second increments in the microwave, stirring in between until the chocolate is glossy and completely smooth.
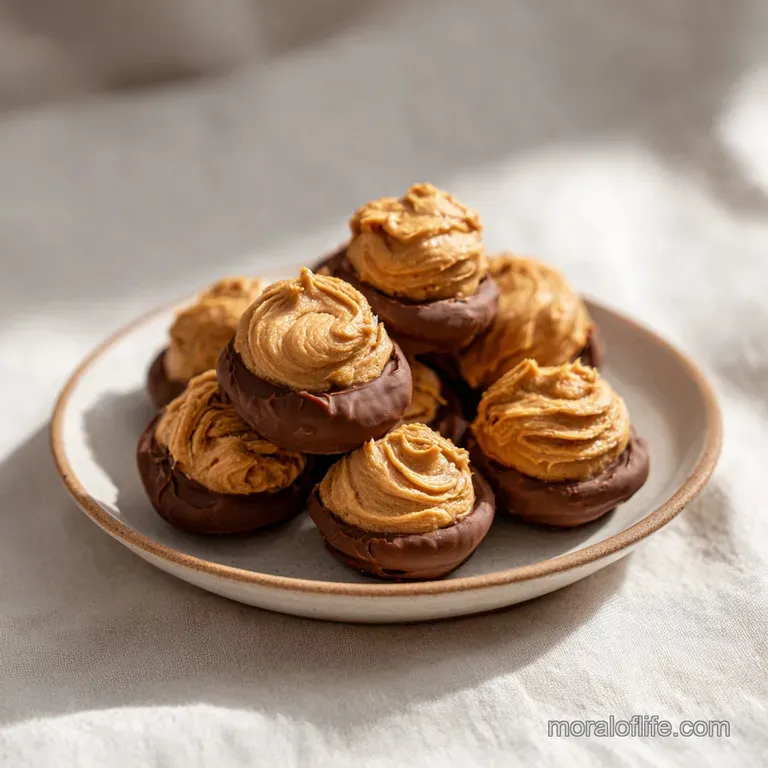
- Hold the toothpick and dip each chilled ball into the chocolate, leaving a small circle of peanut butter showing at the top.
- Place back on the parchment and refrigerate for 30 minutes until the chocolate is set and matte.
Chef's Tip: If the hole from the toothpick bothers you, just use a clean finger to gently "smudge" the peanut butter over the hole once you've removed the toothpick. It disappears instantly!
Fixing Common Problems and Avoiding Sticky Situations
The biggest hurdle with any Homemade Peanut Butter Buckeye Ball Recipe with Chocolate is usually the consistency of the dough. It can be affected by the humidity in your kitchen or even the specific brand of peanut butter you use. If it feels too soft to roll, don't just keep adding sugar, or they will become chalky.
Why Your Peanut Butter Balls are Falling Apart
If the balls crumble as you try to roll them, the dough is too dry. This usually happens if the sugar was packed into the measuring cup rather than spooned and leveled.
| Problem | Root Cause | Solution |
|---|---|---|
| Crumbly Dough | Too much sugar or cold PB | Add 1 tsp of melted butter at a time until it holds |
| Melting Chocolate | Chocolate too hot | Let melted chocolate sit for 5 mins before dipping |
| Sticky Surface | Humidity or under chilled | Chill for an extra 30 mins before serving |
Why the Chocolate is Sliding Off the Balls
This is almost always a temperature issue. If the peanut butter balls are too warm, the chocolate won't "grip" the surface. If the chocolate is too hot, it will melt the outer layer of the peanut butter, creating a slippery film.
Common Mistakes Checklist
- ✓ Always sift the sugar un sifted sugar creates a gritty, grainy texture.
- ✓ Pat the peanut butter balls with a paper towel if they look "sweaty" after chilling.
- ✓ Use refined coconut oil rather than unrefined to avoid a strong coconut taste.
- ✓ Don't sub margarine for the butter; the water content is too high and will ruin the dough.
Adjusting the Batch Size for Any Crowd
Scaling this recipe is fairly straightforward because the ratios are quite forgiving. However, because you are working with a lot of powdered sugar, the volume can become an issue if you try to triple the batch in a standard mixer.
- Scaling Down (Making 18): This is easy. Use half of every ingredient. Use a small hand mixer or even a sturdy spatula. The chilling time remains the same at 60 minutes.
- Scaling Up (Making 72): Do not double the salt or vanilla exactly. Use 1.5x the salt (about 0.35 tsp) and 1.5x the vanilla to keep the flavor from becoming overpowering. Work in batches for the dipping process so the second half of the balls don't warm up while you dip the first half.
| Batch Size | Peanut Butter | Sugar | Prep Time |
|---|---|---|---|
| 18 pieces | 0.75 cup | 2 cups | 60 mins |
| 36 pieces | 1.5 cups | 4 cups | 105 mins |
| 72 pieces | 3 cups | 8 cups | 150 mins |
When making a double batch, I recommend melting the chocolate in two separate smaller bowls. This keeps the chocolate "fresh" and at the right dipping temperature for the entire process.
Debunking Traditional Buckeye Myths
A lot of old-fashioned recipes insist on using paraffin wax in the chocolate. The myth is that it’s the only way to get a shiny coating that won't melt on your fingers. That is simply not true.
Refined coconut oil achieves the exact same result a beautiful, snappy sheen without making your treats taste like a scented candle.
Another common misconception is that you need "special" dipping tools. While a chocolate fork is nice, a humble toothpick is actually superior for Buckeyes. It allows you to submerge the ball deeply while maintaining that perfect "eye" of peanut butter at the top.
The hole it leaves is a small price to pay for the precision you get.
Keeping Your Peanut Butter Treats Fresh and Snappy
These are high fat, high sugar treats, which means they store incredibly well, but they are sensitive to heat. If you leave them on a sunny counter, the chocolate will bloom (get those weird white streaks) and the peanut butter will soften too much.
- Storage: Store in an airtight container in the fridge for up to 2 weeks. Use parchment paper between layers to prevent sticking.
- Freezing: These freeze beautifully! Place them on a tray to flash freeze for an hour, then toss into a freezer bag. They stay perfect for up to 3 months.
- Zero Waste: If you have leftover melted chocolate, stir in some crushed pretzels or rice cereal, drop spoonfuls onto parchment, and you’ve got a second "bonus" treat. You can also save the "crumbs" of the peanut butter dough and mix them into vanilla ice cream.
Three Ways to Plate Your Buckeyes from Simple to Gourmet
Presentation is half the fun with Buckeyes. Since they have that striking two tone look, they stand out on any dessert spread. You can keep it casual or go full "pastry chef" depending on the occasion.
| Level | Plating Style | Technique |
|---|---|---|
| Simple | The Party Platter | Stacked in a pyramid on a white ceramic plate |
| Polished | The Gift Box | Each ball in a mini gold foil cupcake liner |
| Restaurant | The Dessert Deco | Served on a slate board with a dash of flakey sea salt |
For a "Restaurant" feel, I love to drizzle a tiny bit of extra dark chocolate over the top in a zigzag pattern after the first layer has set. It adds texture and looks incredibly high end. If you really want to impress, serve them alongside a small glass of cold milk or a bitter espresso to cut through the richness.
These little spheres are the ultimate crowd pleaser because they look complex but are rooted in simple, reliable flavors that everyone loves.

Recipe FAQs
Is it necessary to sift the powdered sugar before mixing?
Yes, it is essential for the final texture. Sifting the 4 cups of powdered sugar removes clumps and aerates the sugar, which creates that signature velvety mouthfeel in the finished peanut butter centers.
How to achieve the perfect consistency for the peanut butter dough?
Beat the butter and peanut butter for 2 3 minutes until pale and aerated before adding sugar. This step builds the structural base for your dough, much like how the velvety texture of our other treats relies on proper initial creaming.
How to prevent the chocolate from seizing during melting?
Use 30-second increments when melting the chocolate chips and coconut oil. Stir thoroughly between each cycle to distribute heat evenly and ensure the mixture remains smooth.
Is it true the balls must be frozen for hours before dipping?
No, this is a common misconception. You only need to chill the balls for at least 60 minutes in the refrigerator to ensure they are firm enough to hold their shape during the dipping process.
How to ensure a clean, professional finish on the Buckeye balls?
Hold the toothpick firmly while dipping and leave a small circle of peanut butter exposed at the top. After dipping, carefully return them to the parchment paper and refrigerate for 30 minutes until the shell is completely set.
Can I use margarine instead of unsalted butter?
No, avoid using margarine for this recipe. The higher water content in margarine will ruin the dough's ability to hold together properly, resulting in an unstable center.
How to manage "sweaty" peanut butter balls?
Pat the surface gently with a paper towel if they look moist after chilling. Removing this surface moisture ensures the chocolate shell adheres properly and sets with a smooth, matte finish.
Homemade Peanut Butter Buckeyes
Ingredients:
Instructions:
Nutrition Facts:
| Calories | 186 kcal |
|---|---|
| Protein | 3.1 g |
| Fat | 10.9 g |
| Carbs | 21.4 g |
| Fiber | 1.1 g |
| Sugar | 19.4 g |
| Sodium | 59 mg |
