Bread Without Yeast
- Time: Active 15 minutes, Passive 45 minutes, Total 1 hour
- Flavor/Texture Hook: Buttery, tangy, and soft crumbed
- Perfect for: Last minute dinners, beginner bakers, or yeast free diets
- Baking Soft Homemade Bread Without Yeast
- Why This Quick Loaf Works So Well
- Understanding The Core Elements Of The Dough
- Tools For Your Dependable Kitchen Bake
- Step By Step Toward A Golden Loaf
- Solving Texture and Rise Issues Easily
- Flavor Variations and Simple Swaps
- Keeping Your Bread Fresh and Tasty
- The Best Ways To Enjoy Your Slice
- Recipe FAQs
- 📝 Recipe Card
Baking Soft Homemade Bread Without Yeast
I remember one normal Tuesday when the rain was lashing against the kitchen window and all I wanted was a bowl of hot tomato soup. I reached into the pantry only to find a sad, empty jar where my yeast usually lives. Honestly, don't even bother driving to the store in a storm for one little packet.
I decided right then to stop relying on those finicky granules and figured out how to make a dependable loaf using what I already had in the cupboard.
The first time I pulled this out of the oven, the aroma of toasted butter and warm flour filled the room, and I knew I'd found a keeper. You don't get that "bread y" fermented smell, but you get something else: a cozy, homey scent that reminds me of giant biscuits.
We've all had those days where the schedule falls apart, and this recipe is the sturdy safety net that ensures your dinner still feels special without the three hour wait for a rise.
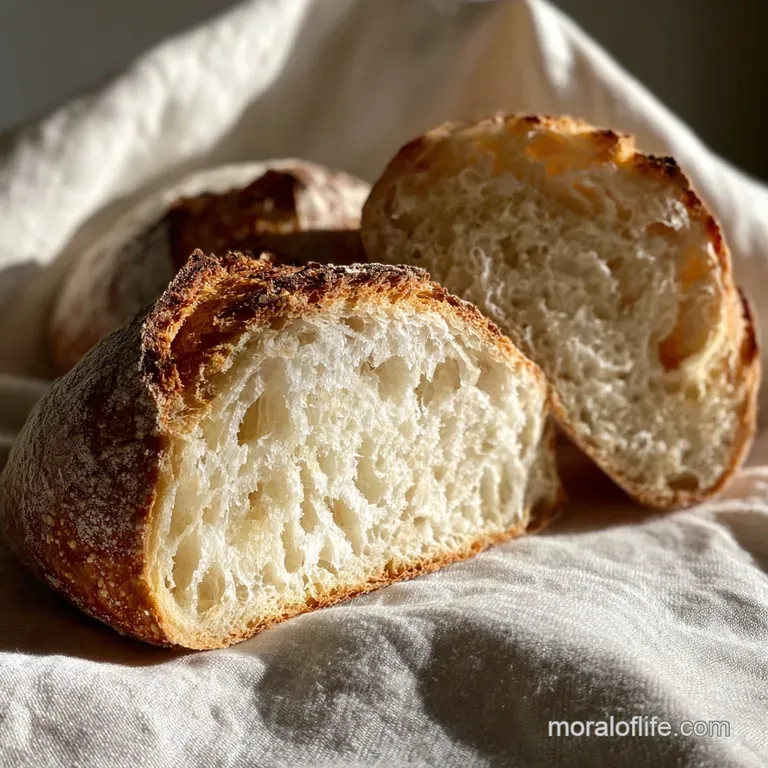
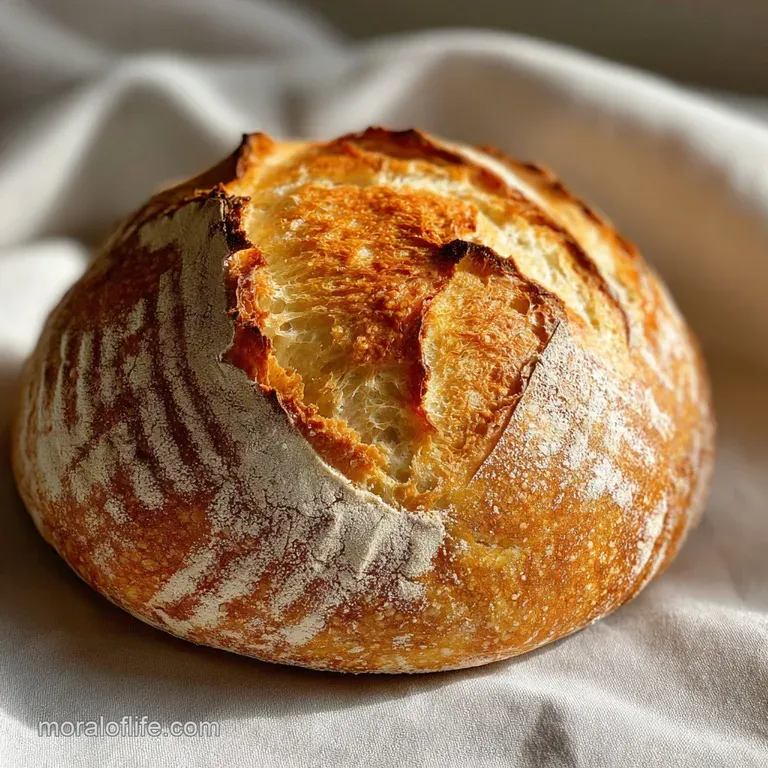
It’s brilliant because you aren't fighting with water temperatures or wondering if your yeast is dead. You just whisk, stir, and bake. This bread won't have the massive air bubbles of a sourdough, but it has a velvety crumb that holds up beautifully under a thick swipe of salted butter or a heavy layer of sandwich meat.
Trust me on this, once you see how easy it is to get a golden loaf on the table in an hour, you'll be making this on repeat with confidence.
Why This Quick Loaf Works So Well
- Chemical Aeration: The combination of baking powder and baking soda creates immediate carbon dioxide bubbles when they hit the acidic buttermilk.
- Protein Softening: The lactic acid in the buttermilk breaks down long gluten strands, which ensures the texture stays tender rather than rubbery.
- Moisture Retention: Using a whole egg adds lecithin, acting as a natural emulsifier that keeps the bread from drying out too quickly.
- Fat Distribution: Melted butter coats the flour particles, preventing a tough structure and giving the crust a light, flaky shatter.
The Physics of the Chemical Lift
When the alkaline baking soda meets the acidic buttermilk, it creates a fast acting reaction that expands the dough instantly. This pressure forces the crumb upward before the heat of the oven sets the starch structure in place.
| Premium Ingredient | Budget Alternative | Flavor Impact | Savings |
|---|---|---|---|
| store-bought Buttermilk | Milk + 1 tbsp Lemon Juice | Slightly less tangy but same lift | Save $4.00 |
| Grass fed Butter | Salted Margarine | Less rich, slightly saltier | Save $3.00 |
| Sea Salt | Standard Table Salt | Sharper salt profile | Save $1.00 |
If you are looking for a different texture, you might find my No Yeast Bread recipe helpful for a slightly different ratio. It's always good to have options depending on what's in your pantry.
Understanding The Core Elements Of The Dough
Getting the right texture in a bread without yeast requires a bit of understanding about how these specific ingredients play together. Since we aren't kneading this for ten minutes to develop gluten, we have to rely on the quality and temperature of our components to do the heavy lifting for us.
| Component | Science Role | Pro Secret |
|---|---|---|
| 375g All Purpose Flour | Structural Base | Weigh it for consistent density |
| 12g Baking Powder | Primary Leavener | Use fresh powder for max lift |
| 360ml Buttermilk | Acidic Catalyst | Room temp prevents butter clumping |
Chef's Tip: Freeze your butter for 10 minutes before melting it. This might sound odd since we are melting it anyway, but I've found it helps the fats separate slightly differently, leading to a much more tender crumb.
Tools For Your Dependable Kitchen Bake
You don't need a fancy stand mixer such as a KitchenAid for this one. In fact, using your hands or a simple wooden spoon is actually better because it prevents overworking the dough. A standard 9x5 inch loaf pan is the classic choice here.
I prefer a light colored metal pan (like those from USA Pan) because dark pans can make the bottom of the bread too dark before the middle is fully baked through.
You'll also want a large mixing bowl and a whisk for the dry ingredients. Making sure the leaveners are perfectly distributed is the secret to avoiding those bitter "soap flavored" pockets of baking soda. If you have a kitchen scale, use it.
Measuring 375g of flour is much more reliable than using cups, which can vary wildly depending on how packed the flour is.
step-by-step Toward A Golden Loaf
Phase 1: Mixing Dry Goods
Whisk the 375g all purpose flour, 25g granulated sugar, 6g sea salt, 12g baking powder, and 3g baking soda in a large bowl. Note: Whisking for a full 30 seconds ensures the leaveners are evenly spread so the bread rises uniformly.
Phase 2: Combining Wet Ingredients
In a separate jug, whisk the 360ml room temperature buttermilk, 56g melted (but cooled) butter, and 1 large egg. Note: If the buttermilk is too cold, the melted butter will seize into tiny clumps.
Phase 3: The Gentle Fold
Make a well in the center of the flour and pour in the liquid. Use a spatula to fold the mixture until no streaks of dry flour remain. Do not overmix or the bread will be tough.
Phase 4: Preparing The Pan
Grease your loaf pan thoroughly with butter or non stick spray. You can also line it with a strip of parchment paper to make removal effortless later on.
Phase 5: Transferring The Dough
Spoon the thick, shaggy dough into the prepared pan. Smooth the top slightly with the back of a spoon dipped in water.
Phase 6: The Oven Entry
Place the pan on the center rack of a preheated 375°F (190°C) oven. Listen for the faint sizzle as the batter hits the hot pan.
Phase 7: The Long Bake
Bake for 45 minutes. Check for a deep golden brown crust and a center that feels firm when pressed.
Phase 8: The Temperature Check
Insert a toothpick or a digital thermometer. The internal temperature should hit 190°F (88°C).
Phase 9: Cooling The Loaf
Let the bread sit in the pan for 10 minutes. Then, move it to a wire rack to prevent the bottom from becoming soggy.
Phase 10: The First Slice
Wait at least 20 minutes before slicing. The crumb needs to set or it will appear gummy when cut.
Solving Texture and Rise Issues Easily
Why Your Bread Stayed Flat
If your loaf didn't lift, the most likely culprit is old leavening agents. Baking powder loses its potency after about six months once opened. To test it, drop a teaspoon into some hot water; if it doesn't bubble vigorously, it's dead. Also, check that you didn't overmix.
Overmixing develops too much gluten, which creates a "cage" that the bubbles can't expand against.
| Problem | Root Cause | Solution |
|---|---|---|
| Gummy center | Underbaked or sliced too hot | Bake to 190°F and cool fully |
| Bitter metallic taste | Clumped baking soda | Sift dry ingredients together |
| Crumbly texture | Too much flour | Weigh flour (375g) next time |
If you ever find yourself making something sweeter, the principles in my Banana Bread recipe are quite similar regarding the chemical lift and moisture balance.
Common Mistakes Checklist
- ✓ Check the expiration date on your baking powder before starting.
- ✓ Ensure the egg and buttermilk are at room temperature.
- ✓ Stop mixing the moment the dry flour disappears.
- ✓ Don't open the oven door for the first 30 minutes of baking.
- ✓ Let the loaf cool on a wire rack to allow steam to escape.
Flavor Variations and Simple Swaps
This base recipe is a blank canvas. I often toss in a cup of sharp cheddar cheese and some dried chives for a savory version that pairs perfectly with chili. If you want something a bit more rustic, you can swap out 100g of the white flour for whole wheat flour, though you might need an extra tablespoon of buttermilk to keep it from being too dry.
Can I Make This dairy-free?
You absolutely can. Use a full fat oat milk or soy milk and add 1 tablespoon of white vinegar or lemon juice. Let it sit for 10 minutes to curdle slightly. Swap the butter for a neutral oil like avocado oil.
The crumb will be slightly more open and less "buttery," but it still makes a fantastic loaf of bread without yeast for those with dairy sensitivities.
The Honey Oat Sweet Loaf
Replace the sugar with 2 tablespoons of honey and stir in 1/2 cup of rolled oats. This creates a slightly denser, sweeter loaf that is incredible when toasted for breakfast. The honey also acts as a humectant, meaning the bread stays moist for an extra day compared to the standard version.
Keeping Your Bread Fresh and Tasty
Since this loaf doesn't have the preservatives found in store-bought bread or the natural acidity of a long fermented sourdough, it's best eaten within two days. Keep it wrapped tightly in beeswax wrap or a plastic bag at room temperature.
Never store it in the fridge, as the cold air will actually pull the moisture out of the starch molecules, making it go stale faster.
Freezing and Reheating
This bread freezes beautifully. I suggest slicing it before freezing so you can just grab a single piece whenever you need it. Wrap the slices in foil and place them in a freezer bag for up to 3 months. When you're ready to eat, just pop a frozen slice directly into the toaster.
It will come out with a crispy exterior and a soft, steamy middle.
Zero Waste Tips
If the bread does go stale, don't you dare throw it away! Cut it into cubes, toss with olive oil and garlic powder, and bake at 350°F until crunchy. These homemade croutons are far better than anything in a box.
You can also pulse stale chunks in a food processor to make fresh breadcrumbs for breading chicken or topping a mac and cheese.
The Best Ways To Enjoy Your Slice
While this bread is fantastic on its own, its sturdy nature makes it perfect for "heavy" toppings. It won't flop over under the weight of a thick avocado mash or a pile of pulled pork. I love serving it alongside a roast chicken dinner to soak up all the juices.
Three Quick Serving Ideas
- The Classic Toast: Toast a slice until the edges are dark gold, then spread with honey and a sprinkle of flaky salt.
- The Savory Melt: Top with a slice of provolone and a tomato, then broil until the cheese is bubbling and brown.
- The Soup Dunk: Cut thick batons (soldiers) and use them to scoop up thick stews or creamy chowders.
Adjusting the Recipe Size
If you need to scale this down for just two people, you can halve the recipe and bake it in a small 6 inch cake pan or a mini loaf pan. Just reduce the baking time by about 10 to 15 minutes.
If you're feeding a crowd and want to double it, I recommend baking two separate loaves in two pans rather than one giant one. Doubling the batter in a single pan often leads to a burnt outside and a raw, doughy middle because the heat can't penetrate the center fast enough.
| Goal | Adjustment | Expected Result |
|---|---|---|
| Extra Crispy Crust | Brush top with melted butter halfway through | Richer flavor and shimmery top |
| More Rise | Increase baking powder to 15g | Slightly more airy but risk of bitter taste |
| Vegan Version | Use flax egg and almond milk + vinegar | Denser crumb, slightly nutty flavor |
The beauty of this bread without yeast is its simplicity and reliability. It’s the kind of recipe that makes you feel like a pro even on your busiest days. It turns a "normal Tuesday" into something that feels like a cozy weekend brunch.
Give it a go, and I bet you'll find yourself skipping the yeast aisle more often than you'd think!

Recipe FAQs
What happens when bread is made without yeast?
It relies on chemical leaveners. Instead of yeast's slow fermentation, baking powder and baking soda create immediate carbon dioxide bubbles for lift, resulting in a denser but tender crumb.
What is 3 ingredient bread?
It typically refers to soda bread or quick bread. Common variations include flour, a liquid (like buttermilk or milk), and a chemical leavener (baking soda or baking powder), sometimes with salt.
Which bread doesn't have yeast in it?
Quick breads and soda breads do not contain yeast. These rely on chemical reactions from ingredients like baking soda or baking powder for their rise.
What is bread without yeast called?
It's generally called quick bread or soda bread. These terms distinguish them from yeast leavened breads like sourdough or traditional loaves.
Can I make quick bread dairy-free?
Yes, you absolutely can. Use a full fat oat or soy milk curdled with vinegar and swap the butter for a neutral oil like avocado oil for a similar texture.
How do I ensure my quick bread has a good rise?
Use fresh leavening agents and don't overmix. Baking powder loses potency over time; test it in hot water. Overmixing develops too much gluten, creating a tough structure that hinders lift.
What's the best way to store bread made without yeast?
At room temperature, tightly wrapped. Avoid the refrigerator, which can paradoxically make it stale faster. For longer storage, slice and freeze it.
Bread Without Yeast

Ingredients:
Instructions:
Nutrition Facts:
| Calories | 174 kcal |
|---|---|
| Protein | 4.8 g |
| Fat | 4.8 g |
| Carbs | 27.4 g |
| Fiber | 0.8 g |
| Sugar | 3.6 g |
| Sodium | 378 mg |
